Building a CRUD application with GraphQL and SpringBoot
GraphQl has become a popular choice for building APIs due to its flexibility and efficiency in handling data. In this article we will walk through creating a simple CRUD(Create, Read, Update, Delete) APIs for user details using SpringBoot and GraphQL.
At the end of this article you will be able to set up a SpringBoot project with basic CRUD example with GraphQL queries and mutation.

A Quick introduction to GraphQL —
- GraphQL is a query language for APIs and a runtime for executing those queries with your existing data, it is an alternative to REST, SOAP or GRPC.
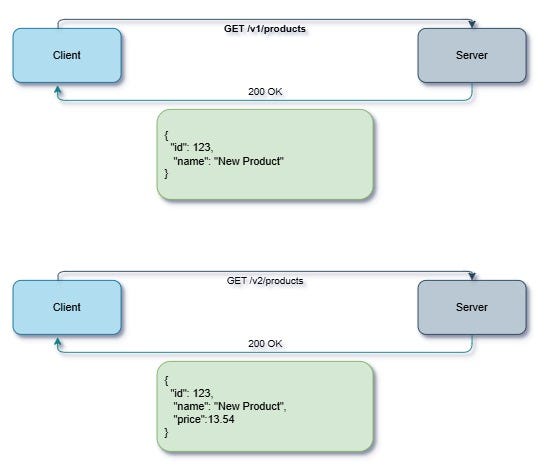
- Unlike REST APIs where the server defines the response structure, GraphQL allows clients to request only the specific fields they need. This reduces over-fetching and under-fetching of data, improving performance and flexibility.
Create a new Spring boot Project-
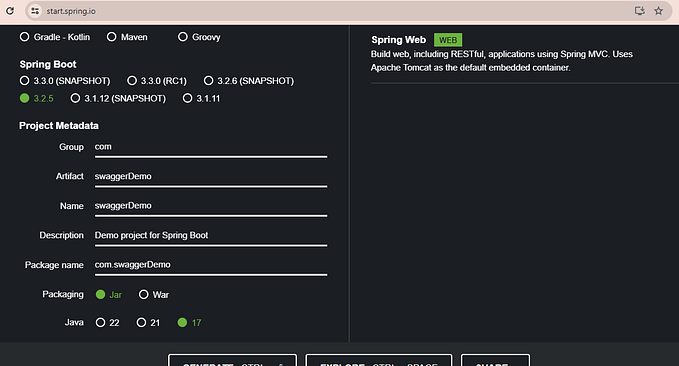
You can use https://start.spring.io/ to create a new Spring Boot project , make sure you add following dependencies-
- Spring Data JPA
- Spring Web
- H2 Database (for simplicity)
- Spring for GraphQl
- Lombok

Connecting to the H2 database-
For establishing connection to h2 database add following content to the application.properties
If you want help in configuring h2 database please find more details here — https://medium.com/stackademic/springboot-with-h2-database-8c1502c3ef54
spring.application.name=GraphQLIntro
spring.datasource.url=jdbc:h2:mem:testdb
spring.datasource.driverClassName=org.h2.Driver
spring.datasource.username=sa
spring.datasource.password=password
spring.jpa.database-platform=org.hibernate.dialect.H2Dialect
spring.h2.console.enabled=true
spring.h2.console.path=/h2-console
spring.h2.console.settings.trace=false
spring.h2.console.settings.web-allow-others=false
spring.datasource.generate-unique-name=false
Lets create folder structure and classes to add our CRUD functionality
Creating Schema for GraphQL -
Next, create a schema.graphqls file inside src/main/resources/graphql/ and define the types and operations (queries and mutations) for managing users.
type User{
    id: ID
    name: String
    email: String
}

type UserResponse {
    message: String
    user: User
    userList: [User]
}

type Query{
    user(id: ID!): UserResponse
    users: UserResponse
}

type Mutation {
    createUser(name: String!, email: String!): UserResponse
    updateUser(id: ID!, name: String, email: String): UserResponse
    deleteUser(id: ID!): String
}
This GraphQL schema defines types and operations for managing users in a system.
- The
Querytype defines the operations that can be performed to fetch data from the server. - The
Usertype represents a user object in the system. - The
UserResponsetype represents a UserResponse object in the system. - The
Mutationtype defines the operations that can modify data on the server (such as creating, updating, or deleting users).
Creating Model class for User and UserResponse
User Model—
Create a simple User model class in src/main/java/com/example/GraphQLIntro/model/User.java:
package com.example.GraphQLIntro.model;

import lombok.AllArgsConstructor;
import lombok.Data;
import lombok.NoArgsConstructor;

@AllArgsConstructor
@NoArgsConstructor
@Data
public class User {
    private long id;
    private String name;
    private String email;

    public User(String name, String email) {
        this.name =name;
        this.email =email;
    }
}
UserResponse Model
The UserResponse class wraps the response message and user details:
package com.example.GraphQLIntro.model;

import com.example.GraphQLIntro.entity.UserEntity;
import lombok.*;

import java.util.List;


@Builder
@Data
@Getter
@Setter
public class UserResponse {

    String message;
    User user;
    List<User> userList;

}
Create User Entity
Now, create a UserEntity class that represents the user in the database. This will be used by Spring Data JPA to interact with the database.
package com.example.GraphQLIntro.entity;

import jakarta.persistence.Entity;
import jakarta.persistence.GeneratedValue;
import jakarta.persistence.Id;
import lombok.AllArgsConstructor;
import lombok.Data;
import lombok.NoArgsConstructor;

@Entity
@Data
@AllArgsConstructor
@NoArgsConstructor
public class UserEntity {
    @GeneratedValue
    @Id
    private long id;
    private String name;
    private String email;
    public UserEntity(String name, String email){
        this.email =email;
        this.name = name;
    }
}
Creating Repository layer to manage db operations
The repository will handle database operations for the UserEntity class. Create the UserRepository interface.
package com.example.GraphQLIntro.repository;

import com.example.GraphQLIntro.entity.UserEntity;
import org.springframework.data.jpa.repository.JpaRepository;
import org.springframework.stereotype.Repository;

@Repository
public interface UserRepository extends JpaRepository<UserEntity,Long> {
}
Creating Service and ServiceImpl for user buisness logic
Now, let’s implement the business logic for the CRUD operations in the UserService and UserServiceImpl.
UserService Interface
package com.example.GraphQLIntro.service;

import com.example.GraphQLIntro.entity.UserEntity;
import com.example.GraphQLIntro.model.User;
import com.example.GraphQLIntro.model.UserResponse;

public interface UserService {
    UserResponse findAll();
    UserResponse findById(Long id);
    UserResponse save(User user);
    String  delete(Long id);
    UserResponse update(Long id, UserEntity updatedUserEntity);
}
UserServiceImpl-
package com.example.GraphQLIntro.service;

import com.example.GraphQLIntro.entity.UserEntity;
import com.example.GraphQLIntro.model.User;
import com.example.GraphQLIntro.model.UserResponse;
import com.example.GraphQLIntro.repository.UserRepository;
import com.fasterxml.jackson.core.type.TypeReference;
import com.fasterxml.jackson.databind.ObjectMapper;
import org.springframework.beans.factory.annotation.Autowired;
import org.springframework.stereotype.Service;

import java.util.List;
import java.util.Optional;

@Service
public class UserServiceImpl implements UserService {

    @Autowired
    ObjectMapper objectMapper;

    @Autowired
    private UserRepository userRepository;

    // Find all users
    public UserResponse findAll() {
        List<UserEntity> userEntity = userRepository.findAll();
        List<User> userList = objectMapper.convertValue(userEntity, new TypeReference<List<User>>() {});
        UserResponse userResponse = UserResponse.builder()
                .userList(userList)
                .message("Successfully fetched the user list")
                .build();
        return userResponse;
    }

    // Find user by id
    public UserResponse findById(Long id) {
        Optional<UserEntity> userEntity = userRepository.findById(id);
        if (userEntity.isPresent()) {
            User user = objectMapper.convertValue(userEntity.get(), User.class);
            UserResponse userResponse = UserResponse.builder()
                    .user(user)
                    .message("Fetched user successfully for id - " + id)
                    .build();
            return userResponse;
        } else {
            return UserResponse.builder()
                    .message("User not found for id - " + id)
                    .build();
        }
    }

    // Save a new user
    public UserResponse save(User user) {
        try {
            UserEntity userEntity = new UserEntity(user.getName(),user.getEmail());
            userRepository.save(userEntity);
            return UserResponse.builder()
                    .message("User Saved Successfully")
                    .build();
        } catch (Exception e) {
            throw new RuntimeException("Failed to save user");
        }
    }

    // Delete a user by id
    public String delete(Long id) {
        try {
            userRepository.deleteById(id);
            return "User deleted successfully";
        } catch (Exception e) {
            throw new RuntimeException("Failed to delete user");
        }
    }


    // Update user by id
    public UserResponse update(Long id, UserEntity updatedUserEntity) {
        try {
            // Check if user exists
            Optional<UserEntity> existingUser = userRepository.findById(id);

            if (existingUser.isPresent()) {
                UserEntity userEntity = existingUser.get();

                // Update fields (set new values from the updatedUserEntity)
                if (updatedUserEntity.getName() != null) {
                    userEntity.setName(updatedUserEntity.getName());
                }
                if (updatedUserEntity.getEmail() != null) {
                    userEntity.setEmail(updatedUserEntity.getEmail());
                }
                userRepository.save(userEntity);
                User updatedUser = objectMapper.convertValue(userEntity, User.class);

                return UserResponse.builder()
                        .user(updatedUser)
                        .message("User updated successfully for id - " + id)
                        .build();
            } else {
                return UserResponse.builder()
                        .message("User not found for id - " + id)
                        .build();
            }
        } catch (Exception e) {
            throw new RuntimeException("Failed to update user", e);
        }
    }
}
Creating Controller
The controller will handle the GraphQL queries and mutations. It will use the service methods to perform CRUD operations.
package com.example.GraphQLIntro.controller;
import com.example.GraphQLIntro.entity.UserEntity;
import com.example.GraphQLIntro.model.User;
import com.example.GraphQLIntro.model.UserResponse;
import com.example.GraphQLIntro.service.UserServiceImpl;
import org.springframework.beans.factory.annotation.Autowired;
import org.springframework.graphql.data.method.annotation.Argument;
import org.springframework.graphql.data.method.annotation.MutationMapping;
import org.springframework.graphql.data.method.annotation.QueryMapping;
import org.springframework.stereotype.Controller;
@Controller
public class UserController {
@Autowired
private UserServiceImpl userService;
@QueryMapping
public UserResponse users() {
return userService.findAll();
}
@QueryMapping
public UserResponse user(@Argument Long id) {
return userService.findById(id);
}
@MutationMapping
public UserResponse createUser(@Argument String name, @Argument String email) {
User user = new User(name, email);
return userService.save(user);
}
@MutationMapping
public UserResponse updateUser(@Argument Long id, @Argument String name, @Argument String email) {
UserEntity user = new UserEntity(name, email);
return userService.update(id, user);
}
@MutationMapping
public String deleteUser(@Argument Long id) {
return userService.delete(id);
}
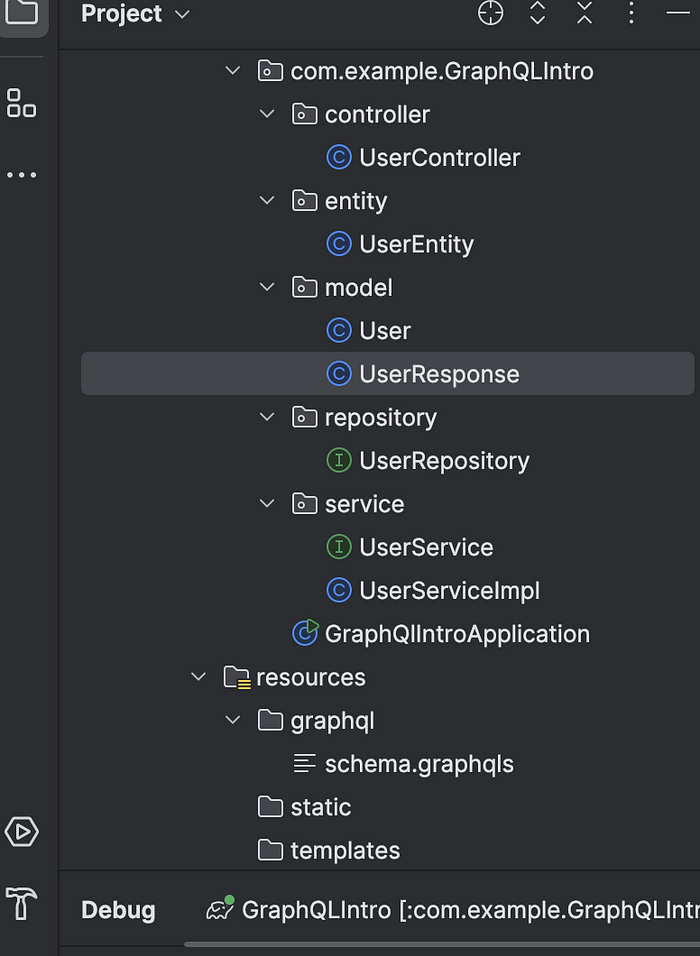
}After all classes has been added your folder structure should look like
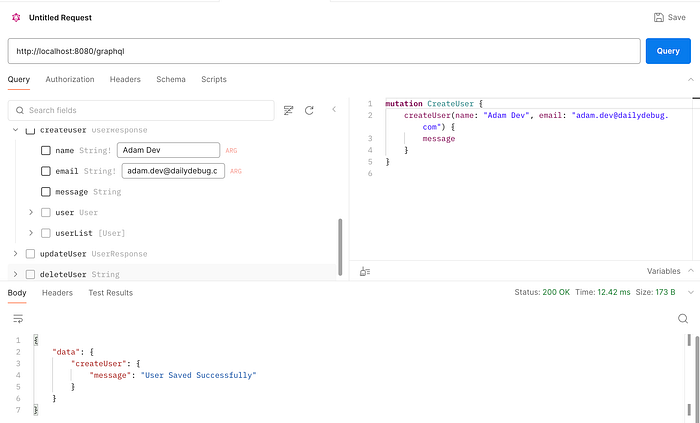
Run the project and once application is up test the GQL at http://localhost:8080/graphql-
Create User
Use this mutation for creating user -
mutation CreateUser {
    createUser(name: "Adam Dev", email: "adam.dev@dailydebug.com") {
        message
    }
}
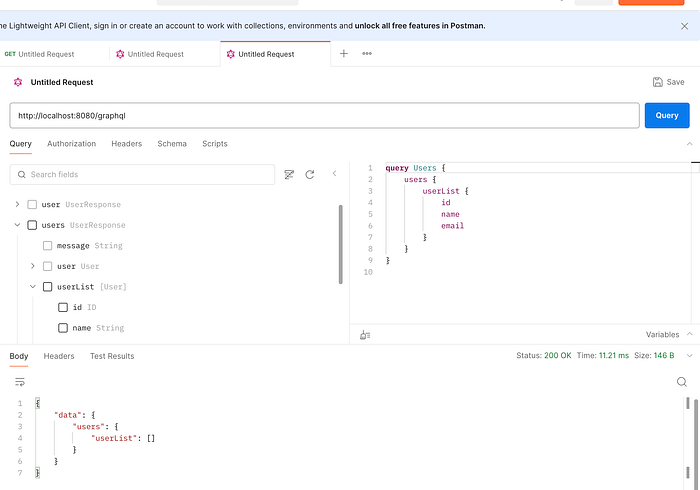
Lets test if user has been saved to db by getting all user list from db using following query
Get All Users -
query Users {
    users {
        message
        userList {
            id
            name
            email
        }
    }
}
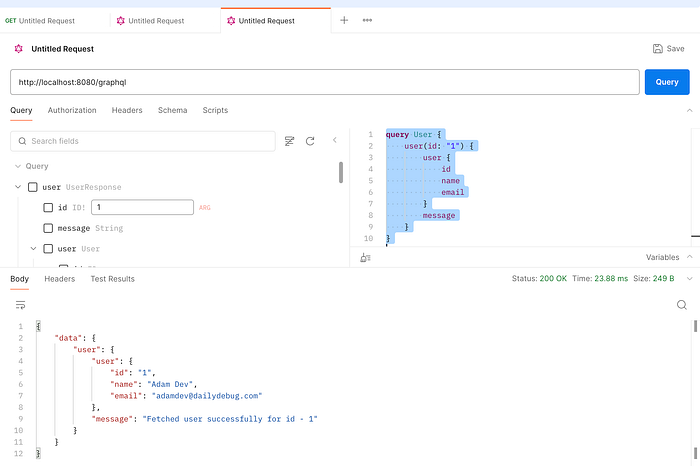
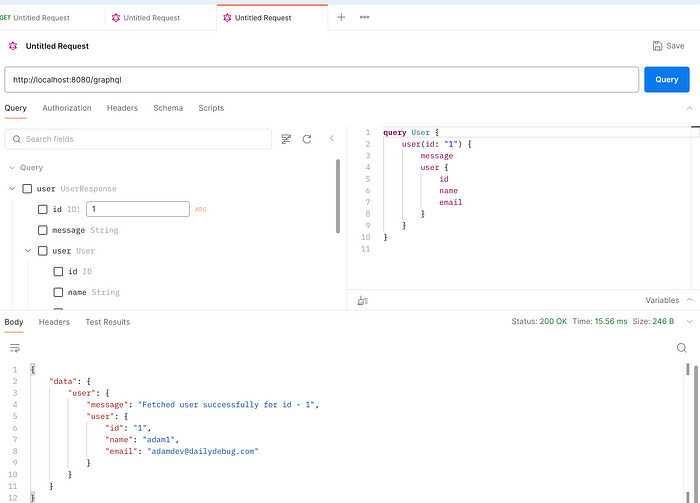
Get User By Id —
query User {
    user(id: "1") {
        user {
            id
            name
            email
        }
        message
    }
}
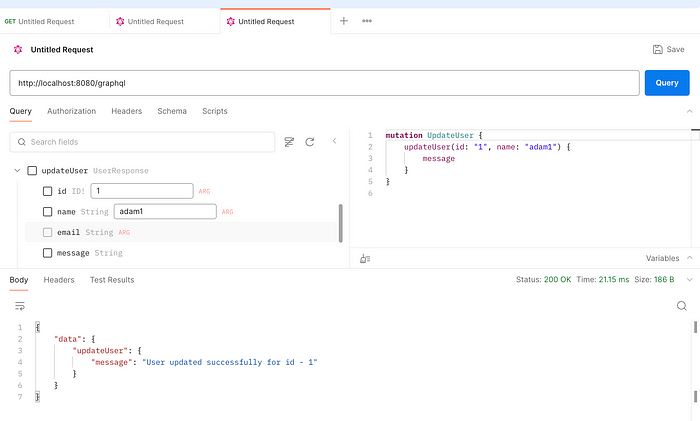
Update User —
mutation UpdateUser {
    updateUser(id: "1", name: "adam1") {
        message
    }
}
Lets check if update was done in db by using get user by id-
Delete user
mutation DeleteUser {
    deleteUser(id: 1)
}
Check if user deleted from db by using get user list query
query Users {
    users {
        userList {
            id
            name
            email
        }
    }
}
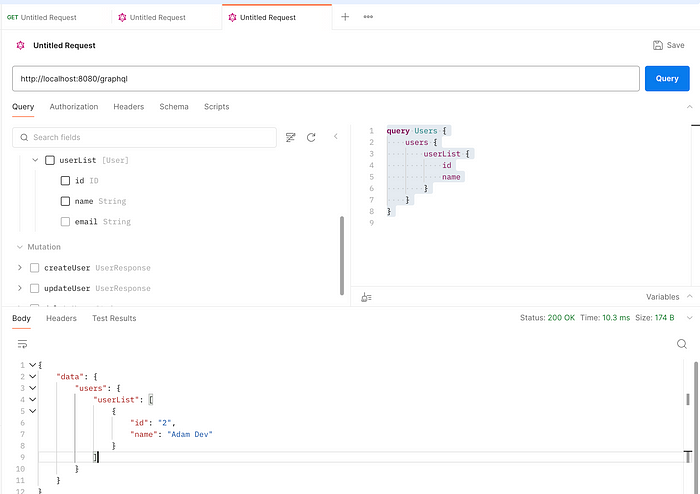
Understanding GraphQL Functionality: Fetching Specific Fields
One of the key benefits of GraphQL is its flexibility to allow clients to request only the data they need. Unlike REST, where the server determines what data to return, in GraphQL, the client can specify exactly which fields to fetch in a query. This helps in reducing over-fetching (getting unnecessary data) and under-fetching (getting insufficient data).
For example, in a traditional REST API, if you want to get user data, you might fetch the full user details, including all fields like id, name, and email. However, with GraphQL, you can request only the fields you need.
Example: Fetching Only User ID and Name
Suppose you want to fetch only the id and name of a user, but not the email. Here's how you can do that by modifying the GraphQL query.
query Users {
    users {
        userList {
            id
            name
        }
    }
}
Summary
In this article, we explored how to build a basic CRUD (Create, Read, Update, Delete) application using Spring Boot and GraphQL. GraphQL provides a more flexible and efficient alternative to traditional REST APIs by allowing clients to specify exactly which data they need in a single query.
Key Benefits of GraphQL:
- Flexibility: Clients have full control over which fields they request, resulting in minimal data transfer.
- Customization: Queries can be customized to return only the necessary data, making the API more efficient.
- No Over-fetching: Unlike REST, where responses may include unnecessary fields, GraphQL ensures that only the requested fields are returned.
By following this guide, you can easily create a CRUD application with GraphQL and Spring Boot, leveraging the power of GraphQL’s flexible querying capabilities to optimize your API’s performance and responsiveness.
If you are facing any issue setting up the application the entire code can be found at this repository — https://github.com/prerna1996/GraphQlCrudWithSpringBoot/
Thanks for reading the article till the end, Give a clap and follow and subscribe for more such articles.
Feel free to drop any suggestion/feedback or queries in the comment box.